http://www.howcast.com/videos/306251-Clear-Mount-Stamps-With-Dawn

Wednesday, December 16, 2009
Tuesday, December 15, 2009
More Valentine Day Cards - today's kind
Most are made with the new Stampin UP paper, but I used my own stamps.


Monday, December 14, 2009
Vintage Valentine Day Cards
I know, it is not yet Christmas - and I'm doing Valentine Day cards???
It actually makes a lot of sense to me as I'm participating in Polarfest next month, and a good supply of cards need to be on hand.
These cards were printed from a Vintage Valentine CD. Some of them I remember getting as a child when all the kids in my class used to exchange Valentine's Day. Remember the box they were put in?
To make them look old I used the cracked glass technique - applying 5 coates of UTEE and then leaving the cards in the freezer over night, after which I deliberately "cracked" them.
Enjoy.
Tomorrow I will post some modern day Valentines.


Saturday, December 12, 2009
It's been a long time coming- unmounted stamps
I'm so excited! Over the past few years, there has been enormous demand from demonstrators and customers alike for a line of repositionable clear-mount rubber stamps. Well, you asked for it, and now you have it! Starting with stamps in the 2010 Occasions Mini Catalog and the 2010 Sale-A-Bration Brochure, Stampin' Up! now offers our exclusive stamp art in both traditional wood-mount, and the new clear-mount option. Customers can begin ordering January 5!
Our new clear-mount rubber stamps are the result of extensive research with the intent to maintain the very best image quality in the stamping industry, while at the same time offering the ease-of-use and storability inherent in repositionable clear-mount rubber stamps.
Clear-Mount Rubber Stamp Features
E-mail me if you want more information
- Nine different sizes of clear blocks available individually or as a discounted bundle.
- Blocks have ergonomic grooves on all four sides for easy grip and traditional wood-mount feel.
- Stamps and blocks are durable and easy to clean with your Stampin' Scrub and Stampin' Mist.
- Optional image labels on stamp backs let you decide if you want to see the image through the block or not.
- Tight die-cutting for easy image positioning.
- Large clear blocks can be used to create collages or spell words with alphabet sets.
- Stamps store easily in standard, DVD-type cases with artwork on front and spine, making organization easy.
FancyTwo Toned Scallop border punch technique
Got this idea from Gretchen Barron from her blog site: http://gretchenbarra.typepad.com
Step One: Using the Slit Punch and holding it upside down (so you can see what you're punching), punch a row down the edge of your cardstock, spacing them about 1/8" apart. I slid the punch all the way up until it stopped and that way I didn't have to worry about the vertical placement of the punch. If you want your scalloped border to extend further to the edge of your finished card, add 1/2" to the dimension along that side before cutting. Another tip -- mark the center point on your cardstock with a small pencil line and punch the center slit first, working out to the edges from the center. This first step may sound a little complicated and intimidating but once you do it, you'll see how easy it is. Don't be afraid -- it's only cardstock and if it takes you a couple of attempts to get it down, it's OK! I found that 7 scallops fit perfectly along the 5.25" edge that shows in this example.
Step Two: Next, simply bend the punched edge to the back. It will pretty much bend on it's own.
Step Three: Now you want to take a stip of contrasting cardstock the length of your punched edge and 1" wide (this is a great way to use up the scraps). Working from the back, apply SNAIL adhesive along the top (make sure it won't show through the punched circles), tap it down so that the edge is flush with the folds
  along your scallop edge, and then fold the entire thing up, setting the SNAIL adhesive by burnishing with your fingers or the flat edge of a Bone Folder. The photo on the left shows you what the back of your project will look like at this point.
Step One: Using the Slit Punch and holding it upside down (so you can see what you're punching), punch a row down the edge of your cardstock, spacing them about 1/8" apart. I slid the punch all the way up until it stopped and that way I didn't have to worry about the vertical placement of the punch. If you want your scalloped border to extend further to the edge of your finished card, add 1/2" to the dimension along that side before cutting. Another tip -- mark the center point on your cardstock with a small pencil line and punch the center slit first, working out to the edges from the center. This first step may sound a little complicated and intimidating butonce you do it, you'll see how easy it is. Don't be afraid -- it's only cardstock and if it takes you a couple of attempts to get it down, it's OK! I found that 7 scallops fit perfectly along the 5.25" edge that shows in this example.
Step Two: Next, simply bend the punched edge to the back. It will pretty much bend on it's own.
Step Three: Now you want to take a stip of contrasting cardstock the length of your punched edge and 1" wide (this is a great way to use up the scraps). Working from the back, apply SNAIL adhesive along the top (make sure it won't show through the punched circles), tap it down so that the edge is flush with the folds along your scallop edge, and then fold the entire thing up, setting the SNAIL adhesive by burnishing with your fingers or the flat edge of a Bone Folder. The photo on the left shows you what the back of your project will look like at this point.
 Step Four:
Put another line of SNAIL on the back flap (the red flap in my example) and burnish it down. Turn your project over and you have this very cool two-tone scallop! From here, you can mount it on another contrasting color and embellish it however you wish! Thanks, Gretchen, for sharing this awesome new border technique!
Step One: Using the Slit Punch and holding it upside down (so you can see what you're punching), punch a row down the edge of your cardstock, spacing them about 1/8" apart. I slid the punch all the way up until it stopped and that way I didn't have to worry about the vertical placement of the punch. If you want your scalloped border to extend further to the edge of your finished card, add 1/2" to the dimension along that side before cutting. Another tip -- mark the center point on your cardstock with a small pencil line and punch the center slit first, working out to the edges from the center. This first step may sound a little complicated and intimidating but
Step Two: Next, simply bend the punched edge to the back. It will pretty much bend on it's own.
Step Three: Now you want to take a stip of contrasting cardstock the length of
Put another line of SNAIL on the back flap (the red flap in my example) and burnish it down. Turn your project over and you have this very cool two-tone scallop! From here, you can mount it on another contrasting color and embellish it however you wish! Thanks, Gretchen, for sharing this awesome new border technique!
Friday, December 11, 2009
Designer Embossing
This information I got from various blog sites as well as "Stampin Success" June 2009 and when I tried it I was "wowed" .
Designer embossing involves white embossing on any of the Designer Series papers. Here's how to do it as well as some helpful tips.
1. Use a dark-coloured Designer Series paper. This will make the white embossing really pop.
2. Make sure the stamped image coordinates with the Designer Series paper or at least complements it. You don't want to create a pattern that is too busy.
3. Choose large images to emboss such as "Upsy Daisy" or "Inspired by Nature"
4. Stamp the image with VersaMark ink, but rub an embossing buddy over your paper first. The embossing buddy keeps the embossing powder from sticking anywhere but on the ink.
5. Cover the image completely with White Stampin' Emboss powder.
6. Shake off the excess powder. For a clean look, use a brush to gently remove loose specks of powder.
7. Heat the image with a heating tool. Hold the tool 4-6 inches away to avoid burning your paper.
Elegant Envelopes
This information was taken from"Stampin Success" December 2009"
Although Stampin Up's envelope assortments are of the highest quality, the designer series paper can become ideal for crafting personalized pouches that match that special occasions card.
1. Take an ordinary envelope and carefully pull it apart. This becomes the pattern.
2. Lay it on the Designer Series paper and trace using either or a stylus.
3. Score along the fold lines of the pattern using a bone folder or a paper cutter with a scoring blade
4. Cut the image.
5. Adhere all but the top flap using a 2-way glue pen.
Addressing:
1. If using a wide pattern, stamp, write or emboss directly on the envelope
2. For a smaller, tighter pattern, write address on a piece of card stock or address label.
This envelope might require extra postage.


Wednesday, December 9, 2009
Matching Copic Marker colours to Stampin Up Colours
I have been doing some research about matching Copic Colors to Stampin Up's Colors on the computer this morning and thought I'd share my findings with you. I didn't do all the color matching work, just combined the lists that I've found online... I hope it's helpful!
Pale Plum - V95 Light Grape
Pretty in Pink - R32 Peach
Blush Blossom - E11 Barely Beige
Apricot Appeal - YR20 Yellowish Shade
Barely Banana - Y11 Pale Yellow
Certainly Celery - G21 Lime Green
Mellow Moss - BG93 Green Gray
Sage Shadow - YG63 Pea Green
Bashful Blue - B93 Light Crockery Blue
Amethyst - B63 Light Hydrangea
Lavender Lace - BV02 Prune
Glorious Green - G17 Forrest Green
Green Galore - G14 Apple Green
Gable Green - YG06 Yellowish Green
Yo-Yo Yellow - Y15 Cadmium Yellow
Only Orange - YR07 Cadmium Orange
Real Red – R46 Strong Red
Orchid Opulence - V15 Mallow
Lovely Lilac - BV17 Deep Reddish Blue
Brilliant Blue - B29 Ultramarine
Tempting Turquoise - BG05 Holiday
Brocade Blue - B45 Smoky Blue
Ballet Blue - B23 Phthalo Blue
Night of Navy - B39 Prussian Blue
Taken with Teal - BG49 Duck Blue
Handsome Hunter - G28 Ocean Green
Always Artichoke - G99 Olive
So Saffron – Y21 Buttercup Yellow
Regal Rose – R85 Rose Red
Rose Red - R59 Cardinal
Elegant Eggplant - V09 Violet
Chocolate Chip - E47 Dark Brown
Creamy Caramel - E33 Sand
More Mustard - YR23 Yellow Ochre
Pumpkin Pie - YR16 Apricot
Really Rust - E08 Brown
Cameo Coral - R22 Light Prawn
Summer Sun - Y17 Golden Yellow
Old Olive - YG95 Pale Olive
Garden Green - YG67 Moss
Not Quite Navy - B97 Night Blue
Blue Bayou - BG09 Blue Green
Soft Sky - BG10 Cool Shadow
Wasabi - YG63 Pea Green
River Rock - YG91 Putty
Groovy Guava - R02 Flesh
Purely Pomegranate- R59 Cardinal
Basic Gray - C-7
Tangerine –YR09 Chinese Orange
Pink Pirouette – RV00 Water Lily
Riding Hood Red – R37 Carmine
Kiwi Kiss – YG03 Yellow Green
Baja Breeze – BG72 Ice Ocean
Pacific Point – B06 Peacock Blue
Friday, November 27, 2009
Saturday, November 21, 2009
Tuesday, November 17, 2009
Glitter ornaments with video


Recently I learned how to make glitter ornaments. Here is how I made them.
Step 1:
Remove the cover of the ornament (the metal part), just be careful to not break the ornament.
Step 2:
drop several drops of classic ink refill, I used riding hood red and so saffron. Move the ornament so the ink spreads in the inside, and all spots are covered.
Step 3:
you may want to use gloves for this step. Using a funnel pour glitter inside, I used red and copper. Cover the opening and shake it up. Pour the glitter from the inside into a container to reuse it or in a coffee filter.
Step4:
Let it dry and after couple hrs put back the metal parts and Voila :)
The video below shows how to make these ornaments and incorporates stamping on the ornaments as well.
The video was made by Melanie Crafts.
Sunday, November 15, 2009


Saturday, November 14, 2009
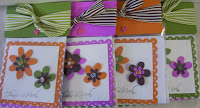
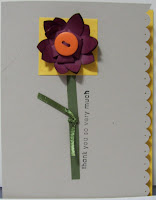
Thank you notes
Both my mother and mother-in-law were sticklers for writing thank you notes after receiving a gift. A phone call wasn't enough (although you had to do that as well). So, with Christmas looming, I decided to make some Thank You notes. The design of these scallop notes was inspired by Andrea Walford. There are 3 notes with envelopes in a package, all three being held together with a topper, brad and ribbon. I used the same colours as Andrea, but the flowers on the front were cut with my Cricuit as I did not have any fusion flowers. The rhinstone brads were non Stampin' Up as well. Because the cards were 4 1/4 by 4 1/4 inches I had to make my own envelopes. 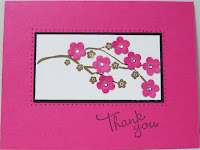


Thursday, November 12, 2009
More copic marker cards.


The above is a polar bear trifold card, showing both the outside and the inside.

Copic Markers
 Last night I learned how to use copic markers,(alcohol based markers) and I had a lot of fun - not that I'm going to switch from my Stampin' Up markers - the price tag is too rich!!! Almost $6.00 per pen and there are over 200 colours. The colours are beautiful, and rich, and the pens can be used directly on paper, are refillable, and the nibs can be changed. I had trouble with the shading, but after practicing I think I'm getting it.
Saturday, October 31, 2009
Stocking stuffer and gift ideas

Another gift I made was a post it note cover with a little pen attached.


I had a lot of fun stamping images on stone tiles and then painting the images with re-inkers mixed with the new shimmer paints. I can't believe how vibrant the colours came out.

I had many requests for the Angel Feather ornaments that I made last year - so I made them again this year. Only the tag was made using Bigz "Two tags" die from Stampin' Up, and the poem created on the MDS program. Let me know if you wish to know the words of the poem.


These photos show candy holders made using the Sizzix Petal Die.
The cute little purses hold gift cards and are so cute they could be hung on the tree as an ornament. They were made using the 5-in-1 envelope template.
My Digital Studio (MDS) - I did it

Against all odds, I completed the requirements for the certification of the MDS (by Oct. 31 as that was the date I was given - only to find that the date had been extended by 1 week). I had some trouble uploading the file to Stampin' Up but after changing internet server the process went smoothly. By the way, in my world (nursing) MDS stands for a lab tech who works in an MDS lab, so I was initially confused by the anacronym. I'll try and download the picture I submitted for you to see.
Since sompleting the requirements, I have done a 22 page scrapbook, and designed a flyer for my Open House, and poems that you will see attached to my ornaments.
Wednesday, October 28, 2009
How do make a snowflake medallion
This was one of the splitcoast stamper tutorials this week and you can do this with Stampin' Up's punches.
Monday, October 26, 2009
Scrapbook Using My Digital Scrapbook - an example
I'm in the process of getting certified for My Digital Scrapbook (MDS). This You Tube video shows what a scapbook looks like using all the features of this software package. Hope you enjoy it.
Sunday, October 25, 2009
Class November 16 and 18

This class will involve a lot of embossing and cutting out shapes, but the ensuring card is absolutely worth it.
Class November 4 - Book Card

Not only will you get a chance to use the Big Shot, but you'll also insert eyelets, and - this is the fun part - learn the Stone Polish Technique. This technique can be messy, so wear some old duds.
Class November 9th 7-9 p.m


We're going to use the brayer and masking to make this beautiful wintery scene. And then we'll take the same stamp and use the dryer technique to make the trees look like there's a blizzard outside.
Class October 28 - Ornaments


The following are pictures of 3 ornaments that could be made on Wednesday, Oct. 28, from 7-9 p.m. One ornament is an angel feather ornament with an attached verse meant to comfort someone who has lost a loved one. The other ornaments depict birds. Of course the cardinal is my favourite. I'm going to try the stained glass technique that Andrea Walford used in her latest video.
Subscribe to:
Posts (Atom)